前言
日常开发过程中,接触更多的是View,对于Window却没有太多的接触,但实际上View都是通过Window来呈现的,而Window又是被WindowManager所管理的。这篇文章只是简单的介绍Window,WindowManager。
Window
Window是一个抽象类,它的唯一实现是PhoneWindow。应用程序的启动流程中会调用ActivityThread的performLaunchActivity(),而在这个方法中会调用Activity的attach(),我们再来看看attach()。1
2
3
4
5
6
7
8
9
10
11
12
13
14
15
16
17
18
19
20
21
22
23
24
25
26
27
28
29
30
31
32
33final void attach(Context context, ActivityThread aThread,
Instrumentation instr, IBinder token, int ident,
Application application, Intent intent, ActivityInfo info,
CharSequence title, Activity parent, String id,
NonConfigurationInstances lastNonConfigurationInstances,
Configuration config, String referrer, IVoiceInteractor voiceInteractor,
Window window, ActivityConfigCallback activityConfigCallback) {
//1.创建PhoneWindow,并设置PhoneWindow的一些属性
mWindow = new PhoneWindow(this, window, activityConfigCallback);
mWindow.setWindowControllerCallback(this);
mWindow.setCallback(this);
mWindow.setOnWindowDismissedCallback(this);
mWindow.getLayoutInflater().setPrivateFactory(this);
if (info.softInputMode != WindowManager.LayoutParams.SOFT_INPUT_STATE_UNSPECIFIED) {
mWindow.setSoftInputMode(info.softInputMode);
}
if (info.uiOptions != 0) {
mWindow.setUiOptions(info.uiOptions);
}
//2.给PhoneWindow设置WindowManager
mWindow.setWindowManager(
(WindowManager)context.getSystemService(Context.WINDOW_SERVICE),
mToken, mComponent.flattenToString(),
(info.flags & ActivityInfo.FLAG_HARDWARE_ACCELERATED) != 0);
if (mParent != null) {
mWindow.setContainer(mParent.getWindow());
}
mWindowManager = mWindow.getWindowManager();
mWindow.setColorMode(info.colorMode);
}
Activity的attach()中主要做了两件事情
- 创建PhoneWindow;
- 给PhoneWindow设置WindowManager
DecorView
PhoneWindow中有一个成员变量。1
private DecorView mDecor;
它是DecorView,它是一个FrameLayout,作为Window的顶层View。那么它是如何被创建的呢,这就要说到Activity的setContentView()了。追随源码。1
2
3
4
5
6
7
8public void setContentView(@LayoutRes int layoutResID) {
getWindow().setContentView(layoutResID);
initWindowDecorActionBar();
}
public Window getWindow() {
return mWindow;
}
getWindow()只是简单的返回了mWindow这个成员,还记得前面的attach()吗,这个方法里面将mWindow初始化为PhoneWindow。也就是说setContentView()实际上调用了PhoneWindow的setContentView()方法。1
2
3
4
5
6
7
8
9
10
11
12
13
14
15
16
17
18
19public void setContentView(int layoutResID) {
if (mContentParent == null) {
//1.创建decorView
installDecor();
} else if (!hasFeature(FEATURE_CONTENT_TRANSITIONS)) {
mContentParent.removeAllViews();
}
if (hasFeature(FEATURE_CONTENT_TRANSITIONS)) {
final Scene newScene = Scene.getSceneForLayout(mContentParent, layoutResID,
getContext());
transitionTo(newScene);
} else {
//2.将传入的布局文件加载到mContentParent中
mLayoutInflater.inflate(layoutResID, mContentParent);
}
//...
}
接下来我们来看看installDecor()里面做了什么事情。1
2
3
4
5
6
7
8
9
10
11
12
13
14
15
16
17private void installDecor() {
if (mDecor == null) {
//创建DecorView
mDecor = generateDecor(-1);
//...
} else {
mDecor.setWindow(this);
}
if (mContentParent == null) {
mContentParent = generateLayout(mDecor);
} else {
//...
}
//...
}
installDecor()主要干了两件事情。
- 调用generator()方法创建DecorView;
- 调用generateLayout()加载布局。
generateDecor()就是创建DecorView。1
2
3
4protected DecorView generateDecor(int featureId) {
//...
return new DecorView(context, featureId, this, getAttributes());
}
我们再来看看generateLayout()1
2
3
4
5
6
7
8
9
10
11
12
13
14
15
16
17
18
19
20
21
22
23
24
25
26
27
28
29
30
31
32
33
34
35
36
37
38
39
40
41
42
43
44
45
46
47
48
49
50
51
52
53
54
55
56
57
58
59
60
61
62
63
64
65
66
67
68
69
70
71
72
73protected ViewGroup generateLayout(DecorView decor) {
/**
* 这里有一大段代码都是在设置属性信息,我就只粘贴关键代码
*/
//...省略若干行代码
/**
* 这里是根据feature找到加载进DecorView的布局文件
*/
int layoutResource;
int features = getLocalFeatures();
if ((features & (1 << FEATURE_SWIPE_TO_DISMISS)) != 0) {
layoutResource = R.layout.screen_swipe_dismiss;
} else if ((features & ((1 << FEATURE_LEFT_ICON) | (1 << FEATURE_RIGHT_ICON))) != 0) {
if (mIsFloating) {
TypedValue res = new TypedValue();
getContext().getTheme().resolveAttribute(
R.attr.dialogTitleIconsDecorLayout, res, true);
layoutResource = res.resourceId;
} else {
layoutResource = R.layout.screen_title_icons;
}
removeFeature(FEATURE_ACTION_BAR);
} else if ((features & ((1 << FEATURE_PROGRESS) | (1 << FEATURE_INDETERMINATE_PROGRESS))) != 0
&& (features & (1 << FEATURE_ACTION_BAR)) == 0) {
layoutResource = R.layout.screen_progress;
} else if ((features & (1 << FEATURE_CUSTOM_TITLE)) != 0) {
if (mIsFloating) {
TypedValue res = new TypedValue();
getContext().getTheme().resolveAttribute(
R.attr.dialogCustomTitleDecorLayout, res, true);
layoutResource = res.resourceId;
} else {
layoutResource = R.layout.screen_custom_title;
}
removeFeature(FEATURE_ACTION_BAR);
} else if ((features & (1 << FEATURE_NO_TITLE)) == 0) {
if (mIsFloating) {
TypedValue res = new TypedValue();
getContext().getTheme().resolveAttribute(
R.attr.dialogTitleDecorLayout, res, true);
layoutResource = res.resourceId;
} else if ((features & (1 << FEATURE_ACTION_BAR)) != 0) {
layoutResource = a.getResourceId(
R.styleable.Window_windowActionBarFullscreenDecorLayout,
R.layout.screen_action_bar);
} else {
layoutResource = R.layout.screen_title;
}
} else if ((features & (1 << FEATURE_ACTION_MODE_OVERLAY)) != 0) {
layoutResource = R.layout.screen_simple_overlay_action_mode;
} else {
layoutResource = R.layout.screen_simple;
}
mDecor.startChanging();
//将找到的layoutResource添加到DecorView中
mDecor.onResourcesLoaded(mLayoutInflater, layoutResource);
//找到id是android.R.id.content
ViewGroup contentParent = (ViewGroup)findViewById(ID_ANDROID_CONTENT);
if (contentParent == null) {
throw new RuntimeException("Window couldn't find content container view");
}
//...
return contentParent;
}
可以看到这个方法的逻辑非常清晰。
- 设置属性信息;
- 根据feature找到layoutResource,用来加载进DecorView;
- 找到id为android.R.id.content的控件返回,这里就是赋给mContentParent的。
mDecor.onResourcesLoaded()里面就是将layoutResource加载进mDecorView中。1
2
3
4
5
6
7
8
9
10
11
12
13
14
15
16
17
18
19
20void onResourcesLoaded(LayoutInflater inflater, int layoutResource) {
//...
final View root = inflater.inflate(layoutResource, null);
//将root添加到DecorView中
if (mDecorCaptionView != null) {
if (mDecorCaptionView.getParent() == null) {
addView(mDecorCaptionView,
new ViewGroup.LayoutParams(MATCH_PARENT, MATCH_PARENT));
}
mDecorCaptionView.addView(root,
new ViewGroup.MarginLayoutParams(MATCH_PARENT, MATCH_PARENT));
} else {
addView(root, 0, new ViewGroup.LayoutParams(MATCH_PARENT, MATCH_PARENT));
}
mContentRoot = (ViewGroup) root;
initializeElevation();
}
PhoneWindow的setContentView()主要做了两件事情
- 调用installDecor()创建DecorView;
- 通过LayoutInflater将我们setContentView()传入的布局加载到mContentParent中,也就是android.R.id.content中。
一般结构
这里我看了layoutResource的布局文件,发现大部分的布局都如下图所示。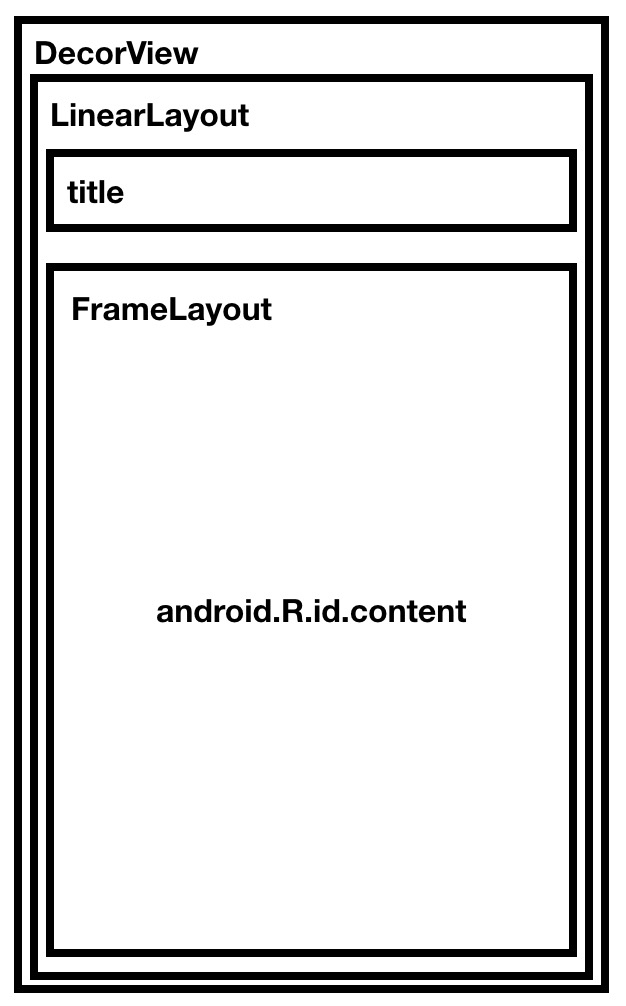 而我们的布局就是被放到这个android.R.id.content布局中的。到这里就差不多了,DecorView就这样加载完毕了。
Callback
Window中定义了一个Callback接口,Activity实现了Window.Callback接口,所以Window可以将某些事情交给Activity处理,回调接口里面的方法目前用到的不是很多,以后有用到的时候再来更新下面的方法。1
2
3
4
5
6
7
8
9
10
11
12
13
14
15
16
17
18
19
20
21
22
23
24
25
26
27
28
29
30
31//键盘事件分发
public boolean dispatchKeyEvent(KeyEvent event);
public boolean dispatchKeyShortcutEvent(KeyEvent event);
//触摸事件分发
public boolean dispatchTouchEvent(MotionEvent event);
public boolean dispatchTrackballEvent(MotionEvent event);
public boolean dispatchGenericMotionEvent(MotionEvent event);
public boolean dispatchPopulateAccessibilityEvent(AccessibilityEvent event);
public View onCreatePanelView(int featureId);
public boolean onCreatePanelMenu(int featureId, Menu menu);
public boolean onPreparePanel(int featureId, View view, Menu menu);
//menu打开的时候
public boolean onMenuOpened(int featureId, Menu menu);
//menuitem 选中的时候
public boolean onMenuItemSelected(int featureId, MenuItem item);
public void onWindowAttributesChanged(WindowManager.LayoutParams attrs);
public void onContentChanged();
//Window焦点改变的时候
public void onWindowFocusChanged(boolean hasFocus);
public void onAttachedToWindow();
public void onDetachedFromWindow();
public void onPanelClosed(int featureId, Menu menu);
public boolean onSearchRequested();
public boolean onSearchRequested(SearchEvent searchEvent);
public ActionMode onWindowStartingActionMode(ActionMode.Callback callback);
public ActionMode onWindowStartingActionMode(ActionMode.Callback callback, int type);
public void onActionModeStarted(ActionMode mode);
public void onActionModeFinished(ActionMode mode);
default public void onProvideKeyboardShortcuts(
List<KeyboardShortcutGroup> data, @Nullable Menu menu, int deviceId) { };
default public void onPointerCaptureChanged(boolean hasCapture) { };
WindowManager
WindowManager是一个接口,它继承自ViewManager,它的实现类是WindowManagerImpl。
ViewManager十分简单,只有添加,更新和删除三个方法。1
2
3
4
5
6public interface ViewManager
{
public void addView(View view, ViewGroup.LayoutParams params);
public void updateViewLayout(View view, ViewGroup.LayoutParams params);
public void removeView(View view);
}
它的具体实现是在WindowManagerImpl中。1
2
3
4
5
6
7
8
9
10
11
12
13
14
15
16
public void addView(@NonNull View view, @NonNull ViewGroup.LayoutParams params) {
applyDefaultToken(params);
mGlobal.addView(view, params, mContext.getDisplay(), mParentWindow);
}
public void updateViewLayout(@NonNull View view, @NonNull ViewGroup.LayoutParams params) {
applyDefaultToken(params);
mGlobal.updateViewLayout(view, params);
}
public void removeView(View view) {
mGlobal.removeView(view, false);
}
可以看到WindowManagerImpl中的方法调用都是委托给了mGlobal成员变量,它是WindowManagerGlobal的单例对象。1
private final WindowManagerGlobal mGlobal = WindowManagerGlobal.getInstance();
WINDOW_SERVICE
在前面讲过的attach()中,我们还有一点没有分析,就是调用mWindow的setWindowManager()。这个方法的实现是在Window中。1
2
3
4
5
6
7
8
9
10
11public void setWindowManager(WindowManager wm, IBinder appToken, String appName,
boolean hardwareAccelerated) {
mAppToken = appToken;
mAppName = appName;
mHardwareAccelerated = hardwareAccelerated
|| SystemProperties.getBoolean(PROPERTY_HARDWARE_UI, false);
if (wm == null) {
wm = (WindowManager)mContext.getSystemService(Context.WINDOW_SERVICE);
}
mWindowManager = ((WindowManagerImpl)wm).createLocalWindowManager(this);
}
我们来看看mContext.getSystemService()是如何获取到WindowManager的。Context的实现类是ContextImpl。1
2
3
4
public Object getSystemService(String name) {
return SystemServiceRegistry.getSystemService(this, name);
}
SystemServiceRegistry是一个专门管理系统服务的类。1
2
3
4public static Object getSystemService(ContextImpl ctx, String name) {
ServiceFetcher<?> fetcher = SYSTEM_SERVICE_FETCHERS.get(name);
return fetcher != null ? fetcher.getService(ctx) : null;
}
SYSTEM_SERVICE_FETCHERS是一个HashMap,通过Context.WINDOW_SERVICE可以获取到注册的WindowManagerImpl对象。在SystemServiceRegistry的静态代码块中我们可以找到注册WindowManager的代码。1
2
3
4
5
6registerService(Context.WINDOW_SERVICE, WindowManager.class,
new CachedServiceFetcher<WindowManager>() {
public WindowManager createService(ContextImpl ctx) {
return new WindowManagerImpl(ctx);
}});
通过CachedServiceFetcher的get()我们可以获取到WindowManagerImpl对象。1
2
3
4
5
6
7
8
9
10
11
12
13
14
15public final T getService(ContextImpl ctx) {
final Object[] cache = ctx.mServiceCache;
synchronized (cache) {
Object service = cache[mCacheIndex];
if (service == null) {
try {
service = createService(ctx);
cache[mCacheIndex] = service;
} catch (ServiceNotFoundException e) {
onServiceNotFound(e);
}
}
return (T)service;
}
}
然后我们再回过头看看Window的setWindowManager()里面的createLocalWindowManager()。1
2
3public WindowManagerImpl createLocalWindowManager(Window parentWindow) {
return new WindowManagerImpl(mContext, parentWindow);
}
这里创建一个新的WindowManagerImpl,并将PhoneWindow与之关联。
LayoutParams
WindowManager中有个重要的内部类,它里面定义了Window的一些重要属性,比如Z-order,window样式等。
type
我们知道Window有很多种,比如Toast,PopupWindow,Dialog,Activity等,在使用手机的过程中经常会看到有很多的Window层叠显示,但是它们必然会存在覆盖关系,也就是说Window在Z轴上是有排列顺序的。而type这个字段实际上表示的是Window在z轴上的排列顺序,也就是我们说的Z-Order,type值越大,Window的显示越靠前。
在LayoutParams中定义了很多的常量,我们可以将Window的分为3类。
- Application Window,type值在1-99之间,一般对应着一个Activity;
- Sub Window,type值在1000-1999之间,一般不能独立存在,需要依附在父Window上,比如Dialog;
- System Window,type值在2000-2999之间,一般需要声明权限才能够创建。
Application Window的常量定义如下。1
2
3
4
5
6public static final int FIRST_APPLICATION_WINDOW = 1;
public static final int TYPE_BASE_APPLICATION = 1;
public static final int TYPE_APPLICATION = 2;
public static final int TYPE_APPLICATION_STARTING = 3;
public static final int TYPE_DRAWN_APPLICATION = 4;
public static final int LAST_APPLICATION_WINDOW = 99;
Sub Window的常量定义如下。1
2
3
4
5
6
7
8public static final int FIRST_SUB_WINDOW = 1000;
public static final int TYPE_APPLICATION_PANEL = FIRST_SUB_WINDOW;
public static final int TYPE_APPLICATION_MEDIA = FIRST_SUB_WINDOW + 1;
public static final int TYPE_APPLICATION_SUB_PANEL = FIRST_SUB_WINDOW + 2;
public static final int TYPE_APPLICATION_ATTACHED_DIALOG = FIRST_SUB_WINDOW + 3;
public static final int TYPE_APPLICATION_MEDIA_OVERLAY = FIRST_SUB_WINDOW + 4;
public static final int TYPE_APPLICATION_ABOVE_SUB_PANEL = FIRST_SUB_WINDOW + 5;
public static final int LAST_SUB_WINDOW = 1999;
System Window的常量定义比较多,这里只列举几个,具体的可以在LayoutParam中找到。1
2
3
4
5
6
7
8
9public static final int FIRST_SYSTEM_WINDOW = 2000;
public static final int TYPE_STATUS_BAR = FIRST_SYSTEM_WINDOW;
public static final int TYPE_SEARCH_BAR = FIRST_SYSTEM_WINDOW+1;
public static final int TYPE_SYSTEM_DIALOG = FIRST_SYSTEM_WINDOW+8;
public static final int TYPE_INPUT_METHOD = FIRST_SYSTEM_WINDOW+11;
public static final int TYPE_INPUT_METHOD_DIALOG= FIRST_SYSTEM_WINDOW+12;
public static final int TYPE_STATUS_BAR_PANEL = FIRST_SYSTEM_WINDOW+14;
public static final int TYPE_SECURE_SYSTEM_OVERLAY = FIRST_SYSTEM_WINDOW+15;
public static final int LAST_SYSTEM_WINDOW = 2999;
softInputMode
这个东西我们在开发过程中经常用到,比如在manifest.xml文件中的activity中设置windowSoftInputMode属性,这就是在设置softInputMode值。softInputMode会影响两点内容
- 软键盘的显示状态,state;
- Window与软键盘之间的交互方式,adjust option。
软键盘的显示状态
softInputMode控制软键盘的显示状态的常量值有如下几种,在LayoutParams中都可以找到。1
2
3
4
5
6
7
8public static final int SOFT_INPUT_MASK_STATE = 0x0f;
public static final int SOFT_INPUT_STATE_UNSPECIFIED = 0;
public static final int SOFT_INPUT_STATE_UNCHANGED = 1;
public static final int SOFT_INPUT_STATE_HIDDEN = 2;
public static final int SOFT_INPUT_STATE_ALWAYS_HIDDEN = 3;
public static final int SOFT_INPUT_STATE_VISIBLE = 4;
public static final int SOFT_INPUT_STATE_ALWAYS_VISIBLE = 5;
下面我们来看看这些常量值会怎样影响软键盘的显示状态。
- SOFT_INPUT_STATE_UNSPECIFIED,不设置任何显示状态;
- SOFT_INPUT_STATE_UNCHANGED,不改变软件盘的显示状态,举个栗子,现在有两个界面A和B,如果A界面的softInputMode设置为stateUnchanged,当你从A界面跳转到B界面再返回A界面的时候,软键盘的显示状态不会发生改变,也就是说,在B界面软件盘如果是显示,那么返回A的时候就是显示的;反之,如果B界面软键盘显示状态是隐藏的,那么返回A的时候就是隐藏的;
- SOFT_INPUT_STATE_HIDDEN,在合适的时候隐藏软键盘,比如用户导航到界面的时候;
- SOFT_INPUT_STATE_ALWAYS_HIDDEN,当Window获得焦点的时候总是隐藏软件盘,这个和stateHidden还是有区别的。举个栗子,同样有两个界面A和B,如果A的softInputMode设置的是stateHidden,当第一次导航到A界面的时候软键盘是隐藏的,当从A跳转到B界面,B界面将软键盘显示出来后再返回A界面,这个时候A界面软键盘保持显示状态;但是,如果A界面的softInputMode设置的是stateAlwaysHidden,同样的操作从B返回A界面的时候,软键盘会被隐藏掉;
- SOFT_INPUT_STATE_VISIBLE,在合适的时候显示软键盘,比如用户导航到界面的时候;
- SOFT_INPUT_STATE_ALWAYS_VISIBLE,当Window获得焦点的时候总是显示软键盘,这个和stateVisible的区别我就不举栗子了,与stateHidden,stateAlwaysHidden的区别一样。
Window和软键盘的交互方式
softInputMode控制Window和软键盘之间的交互方式的常量值有如下几种,同样定义在LayoutParams中。1
2
3
4
5
6public static final int SOFT_INPUT_MASK_ADJUST = 0xf0;
public static final int SOFT_INPUT_ADJUST_UNSPECIFIED = 0x00;
public static final int SOFT_INPUT_ADJUST_RESIZE = 0x10;
public static final int SOFT_INPUT_ADJUST_PAN = 0x20;
public static final int SOFT_INPUT_ADJUST_NOTHING = 0x30;
同样我们再来看看这些常量值会如何影响Window和软键盘之间的交互方式。
- SOFT_INPUT_ADJUST_UNSPECIFIED,不指定任何的交互方式;
- SOFT_INPUT_ADJUST_RESIZE,允许Window改变大小当软键盘显示的时候,这样能够保证Window不被软键盘所遮挡。前方高能,注意,如果Window的flag包含FLAG_FULLSCREEN,那这个值将被忽略,当软键盘显示的时候,Window依旧保持full screen;
- SOFT_INPUT_ADJUST_PAN,当软键盘显示的时候,设置一个窗口平移。这个值不需要处理Window的大小改变,而只需要通过framework层做一个平移保证当前的输入焦点相对于用户是可见的就可以了;
- SOFT_INPUT_ADJUST_NOTHING,当软键盘显示的时候不做任何调整。
flag
这个值主要设置的是Window的一些属性。这里列举一些比较有用的flags。1
2
3
4
5
6
7
8
9
10
11
12//隐藏所有的装饰窗口,比如statusbar等
public static final int FLAG_FULLSCREEN = 0x00000400;
//当前Window在前台会保持屏幕常亮
public static final int FLAG_KEEP_SCREEN_ON = 0x00000080;
//当前Window允许在锁屏之上显示,大概和那些锁屏软件有关系
public static final int FLAG_SHOW_WHEN_LOCKED = 0x00080000;
//当前Window在前台允许进行锁屏操作
public static final int FLAG_ALLOW_LOCK_WHILE_SCREEN_ON = 0x00000001;
//模糊所有在Window之下的东西
public static final int FLAG_DIM_BEHIND = 0x00000002;
//硬件加速
public static final int FLAG_HARDWARE_ACCELERATED = 0x01000000;
其他
Window的left, top, right, bottom主要是由Gravity.apply()方法调用计算出来的。除了和Window的width,height有关外,还和以下几个值有关联x, y, verticalMargin, horizontalMargin。1
public static void apply(int gravity, int w, int h, Rect container, int xAdj, int yAdj, Rect outRect)
这里的xAdj和yAdj的换算方式我们可以在WinodwState的applyGravityAndUpdateFrame()中找到。1
2
3Gravity.apply(mAttrs.gravity, w, h, containingFrame,
(int) (x + mAttrs.horizontalMargin * pw),
(int) (y + mAttrs.verticalMargin * ph), mFrame);
一般情况下x, y的值就是WindowManager.LayoutParams的x, y。
Window的操作
Window的操作分为添加,更新和删除。对于Window的操作,我们可以分为WindowManager对Window的操作,以及WindowManagerService对Window的操作。
Window的添加
我们来看看系统的StatusBar的添加流程。1
2
3
4
5
6
7
8private void addStatusBarWindow() {
//1.创建StatusBar
makeStatusBarView();
mStatusBarWindowManager = Dependency.get(StatusBarWindowManager.class);
mRemoteInputController = new RemoteInputController(mHeadsUpManager);
//2.调用StatusBarWindowManager的add方法
mStatusBarWindowManager.add(mStatusBarWindow, getStatusBarHeight());
}
这个方法做了两件事情
- makeStatusBarView()来创建StatusBar;
- 创建StatusBarWindowManager,然后调用其add()。
再来看看StatusBarWindowManager的add()。1
2
3
4
5
6
7
8
9
10
11
12
13
14
15
16
17
18
19
20
21
22
23
24
25
26public void add(View statusBarView, int barHeight) {
//1.构建WindowManager.LayoutParams
mLp = new WindowManager.LayoutParams(
ViewGroup.LayoutParams.MATCH_PARENT,
barHeight,
//还记得这个值吗,它是一个SystemWindow类型
WindowManager.LayoutParams.TYPE_STATUS_BAR,
WindowManager.LayoutParams.FLAG_NOT_FOCUSABLE
| WindowManager.LayoutParams.FLAG_TOUCHABLE_WHEN_WAKING
| WindowManager.LayoutParams.FLAG_SPLIT_TOUCH
| WindowManager.LayoutParams.FLAG_WATCH_OUTSIDE_TOUCH
| WindowManager.LayoutParams.FLAG_DRAWS_SYSTEM_BAR_BACKGROUNDS,
PixelFormat.TRANSLUCENT);
//下面都是设置WindowManager.LayoutParams的一些参数
mLp.token = new Binder();
mLp.gravity = Gravity.TOP;
mLp.softInputMode = WindowManager.LayoutParams.SOFT_INPUT_ADJUST_RESIZE;
mLp.setTitle("StatusBar");
mLp.packageName = mContext.getPackageName();
mStatusBarView = statusBarView;
mBarHeight = barHeight;
//2.调用WindowManager的addView()
mWindowManager.addView(mStatusBarView, mLp);
mLpChanged = new WindowManager.LayoutParams();
mLpChanged.copyFrom(mLp);
}
这个方法做的事情也十分的明确
- 创建WindowManager.LayoutParams的对象,然后设置一些参数;
- 调用WindowManager的addView(),将StatusBar和LayoutParams对象传入。
前面我们分析过,WindowManager的addView()方法的实现是在WindowManagerImpl类中,但是这个类的方法实现都是委托给WindowManagerGlobal去做的,所以我们只需要查看WindowManagerGlobal的addView()即可。1
2
3
4
5
6
7
8
9
10
11
12
13
14
15
16
17
18
19
20
21
22
23
24
25
26
27
28
29
30
31
32
33
34
35
36
37
38
39
40
41
42
43
44
45
46
47
48
49
50
51
52
53public void addView(View view, ViewGroup.LayoutParams params,
Display display, Window parentWindow) {
//1.校验参数
if (view == null) {
throw new IllegalArgumentException("view must not be null");
}
if (display == null) {
throw new IllegalArgumentException("display must not be null");
}
if (!(params instanceof WindowManager.LayoutParams)) {
throw new IllegalArgumentException("Params must be WindowManager.LayoutParams");
}
final WindowManager.LayoutParams wparams = (WindowManager.LayoutParams) params;
if (parentWindow != null) {
//2.如果该Window作为一个子Window,就根据父Window来调整WindowManager.LayoutParams
parentWindow.adjustLayoutParamsForSubWindow(wparams);
} else {
final Context context = view.getContext();
if (context != null
&& (context.getApplicationInfo().flags
& ApplicationInfo.FLAG_HARDWARE_ACCELERATED) != 0) {
wparams.flags |= WindowManager.LayoutParams.FLAG_HARDWARE_ACCELERATED;
}
}
ViewRootImpl root;
View panelParentView = null;
synchronized (mLock) {
//...
//3.创建ViewRootImpl
root = new ViewRootImpl(view.getContext(), display);
view.setLayoutParams(wparams);
mViews.add(view);
mRoots.add(root);
mParams.add(wparams);
try {
//4.调用ViewRootImpl的setView()
root.setView(view, wparams, panelParentView);
} catch (RuntimeException e) {
if (index >= 0) {
removeViewLocked(index, true);
}
throw e;
}
}
}
这个方法做了如下事情
- 首先会校验传入的参数,包括view,Display,LayoutParams;
- 然后根据LayoutParams的type值以及对Context设置的flag对LayoutParams做不同的调整;
- 创建ViewRootImpl对象;
- 调用ViewRootImpl的setView()。
很明显,我们的调用进一步有转给了ViewRootImpl的setView(),因为setView()中的代码比较多,这里我就只写出我们关心的代码片段。1
2
3
4
5
6
7
8public void setView(View view, WindowManager.LayoutParams attrs, View panelParentView) {
//...
res = mWindowSession.addToDisplay(mWindow, mSeq, mWindowAttributes,
getHostVisibility(), mDisplay.getDisplayId(),
mAttachInfo.mContentInsets, mAttachInfo.mStableInsets,
mAttachInfo.mOutsets, mInputChannel);
//...
}
可以看到,setView()会调用mWindowSession的addToDisplay()。到这里,WindowManager对Window的添加流程就结束了,后面的流程就通过Session与WindowManagerService进行通信了。
首先mWindowSession是一个IWindowSession的实现类。1
final IWindowSession mWindowSession
但是你在framework层搜索不到这个类,因为它是一个aidl文件。在源码库中我们可以找到这个aidl的定义,IWindowSession。这里最终会调用给Session,它是IWindowSession.Stub的实现类,所以我们来看看Session的addToDisplay()。1
2
3
4
5
6public int addToDisplay(IWindow window, int seq, WindowManager.LayoutParams attrs,
int viewVisibility, int displayId, Rect outContentInsets, Rect outStableInsets,
Rect outOutsets, InputChannel outInputChannel) {
return mService.addWindow(this, window, seq, attrs, viewVisibility, displayId,
outContentInsets, outStableInsets, outOutsets, outInputChannel);
}
这个方法实际上调用了mService的addWindow(),mService就是WindowManagerService的实例。1
final WindowManagerService mService;
余生没那么长,不要一味的付出去惯那些得寸进尺的人,请忠于自己,活的像最初的模样。